1. Introduction
This document is intended to provide best practices for Business Rule Optimisation for Planning and PBCS models.
It will cover items which can be edited within the script only i.e. syntax. Essbase.cfg settings for on premises Planning will not be discussed in this blog.
2. Environment Setting
Below are recommended Calculation Commands, which are the elements that instruct the business rule how to execute the calculations.
- SET UPDATECALC OFF turns off intelligent calculation, which is best practice for business rules which use cross dimensional operators and where there may be multiple users accessing the same data block combinations. Using SET UPDATECALC OFF is considered best practice for Planning/PBCS applications where multiple users write to the database. If intelligent calculation is used, ensure it is producing expected results.
- SET AGGMISSG OFF should be set for Planning/PBCS designs where versions are Standard Target or where non leaf data regions are used and cannot be excluded during your calculation. If the Planning/PBCS design has versions setup as Standard Bottom Up, then data is loaded at level0, where SET AGGMISSG ON will benefit.
- SET NOTICE and SET MSG SUMMARY should only be used in development environment for individual calculation analysis. These calc commands should be removed once in production and/or after analysis is completed.
- SET EMPTYMEMBERSETS ON should be used when Run Time Prompts (RTP) are included in FIX statements for Planning/PBCS models so that empty sets are not calculated. Prevents a calculation from running on all members when the set is empty.
3. Optimisation/Performance
- Use templates in Calc Manager business rules to avoid repeating sections of code and make best use of RTP.
- Review dependencies on dynamic calc members within each calculation. If possible, change the calculation to avoid including repeated use of dynamic calc or remove the dynamic calc.
- Use FIX and IF to focus your calculation to ensure only data required is calculated.
- Avoid the creation of a 0 (zero) data result (unless you want to see a zero e.g inventory levels). This will create a block which will be included in all FIX/IF statements and will be calculated. Remove zeros on data load, if possible, or prevent their creation in business rules.
- Many rules have a check to see if, for example: IF ((“Budget”==#missing) OR (“Budget” ==0)). IF (“Budget”+1==1) or IF (Budget/Budget ==#missing) will give the same check but avoids the use of Boolean logic within the IF statement.
- Where possible, perform dense calculations, which do not create blocks, before sparse calculations, which do create blocks. If you need to perform aggregations (e.g to get a total for an allocation calculation), ensure that you only aggregate the section of the data that is required for that allocation calculation.
- Minimise the passes on a database where possible.
- Avoid recursive formulas. Excessive recursion can create environment performance issues as well as adding a requirement to clear values to produce consistent results.
4. FIX Statements
- FIX statements are used to focus the business rule i.e. to keep the # blocks being calculated to be as low as possible i.e. only calculate blocks that are needed.
- FIX is recommended for sparse dimensions because, when used on sparse, it reduces the # blocks that are required for the calc.
- Ensure calculations are done on level 0 of all dimensions when versions are bottomup in Planning/PBCS models.
- Use outer FIX statements on sparse dimensions with inner IF statements on dense dimensions where possible.
- All FIX statements should include members from ALL dimensions, except dimensions that are within the calculation. If a dimension is excluded, all members from that dimension will be included and it is likely that this is not required.
- Nest FIX statements where possible to reduce the number of passes on the database. Each full FIX requires a pass on the database. For example, use an outer FIX for Version, Scenario, and/or any other dimension selections that are static throughout the business rule.
- For Planning/PBCS business rules associated with web forms, leverage the selected page and POV members in FIX statements to reduce the number of blocks calculated.
5. IF Statements
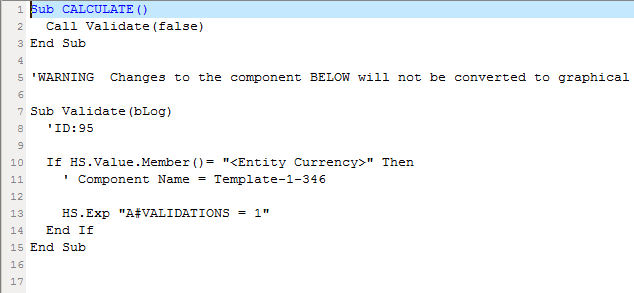
- IF can be used in member formula. FIX cannot.
- IF should be used within FIX statements to reduce the #blocks that need to be accessed. IF brings all blocks within the FIX into memory.
- Use outer FIX statements on sparse dimensions with inner IF statements on dense dimensions where possible.
- Use ELSE instead of a combination of NOT and ELSEIF where possible to avoid unnecessary analysis of member values during the calculation. However, if an ELSE is not required, it is not necessary.
- Order IF statements, if possible, where the most number of cases hit the first IF in the block. Use NOT within the IF to ensure this, if applicable. See blog https://blogs.oracle.com/pa/entry/essbase_11_1_2_optimisation for more information on using NOT in IF statements.
- Review the Calc Member Block choice. A sparse member without dynamic calc dependencies would be a better choice.
6. Only Calculate Blocks Required
- For Planning/PBCS models, use RTP to ensure that only the data required is included in the business rule.
- Only aggregate/calculate data that is required at each stage of the calculation to ensure you keep the number of blocks included in the calculation as low as possible for as long as possible.
7. Level of Calculations
- For Planning/PBCS models, ensure calculations are done on level 0 of all dimensions when versions are bottomup.
- For Planning/PBCS models, aggregations should only be included in the BSO Plan Type if required for the approval process. Other aggregations should be moved to the ASO Plan Type.
- Try and keep the number of blocks included in your calculations to be as low as possible, for as long as possible.
8. Syntax
- Always use @LEVMBRS rather than @RELATIVE if used on the entire dimension.
- Use @CHILDREN instead of @RELATIVE, if applicable.
- Use @REMOVE and @LEVMBRS if you only want to exclude some members from a FIX.
9. Block vs Cell Mode
- Using block mode, where cells are grouped within the block and simultaneously calculated, is generally faster but data dependencies must be carefully considered e.g. SalesYTD = CurMth + PriorMth would have to be calculated in cell mode so that each month is calculated in the order of the outline.
- Using cell mode, each cell is calculated sequentially in the order of the dense dimensions in the outline, is generally slower than block mode.
- Use @CALCMODE to manually control block vs. cell mode.
- Use debug mode application logs to verify calc mode. If a calculation is performed in block mode, no message will appear. A log message will be shown where calculations are performed in cell mode.
10. BottomUp vs TopDown
- Add calculation function @CALCMODE(BOTTOMUP); or calculation command SET FRMLBOTTOMUP to calculate existing blocks only (BOTTOMUP) instead of potential blocks (TOPDOWN).
- TOPDOWN calculations will calculate all potential data blocks with the member. For this reason, it is important that any irrelevant members within sparse dimensions are removed.
- Thoroughly test calculations using BOTTOMUP to ensure that blocks are created correctly when using @CALCMODE.
- Ensure testing is completed with clearing data and re-running the calculation to ensure all blocks are created correctly, especially when using BOTTOMUP.
- Use debug mode application logs to verify calcmode. If a calculation is performed BOTTOMUP, no message will appear. A log message will be shown where calculations are performed TOPDOWN.
11. Create Blocks
- Blocks, generally, will be created on the following actions:
- Data load
- DATACOPY
- Sparse calculations e.g. AGG or SparseMember = X * X/X;
- A sparse calculation is triggered:
- Where sparse members are on the left of the =
- Where the formula is within a sparse calc member block e.g. “Budget”(“Sales” = “Sales”->”Actual” * 0.95;) where Scenario is sparse and Measures are dense.
- Creating blocks can be carried out using the calculation commands SET CREATEBLOCKONEQ, SET CREATENONMISSINGBLK or the calculation function @CREATEBLOCK. It is recommended that if these settings are required that they are used very sparingly and within a tight FIX statement. Test to see if it is possible to avoid the use of these statements by changing the type of calculation being performed.
- Block creation is a design related topic. Where there is an issue, it is important to prove that this is a block creation issue before using these calculation commands or calculation function. Submit a 0 into the target block and re-run the calc to prove a block creation issue.
12. Aggregations
- A sparse dimension aggregation should be ordered starting with the dimension that creates the fewest blocks to the one that creates the most blocks in order to keep the number of blocks as low as possible for as long as possible.
- In Planning/PBCS models, end user business rules should not aggregate entire sparse dimensions
- In Planning/PBCS models, any aggregations required for reporting only should be moved to the ASO Plan Type.
- n Planning/PBCS models, only aggregate data that is required for the Planning approval process.
- AGG vs CALC DIM Calculation Commands
- CALC DIM will execute any member formula
- CALC DIM will aggregate dense or sparse dimensions.
- AGG performs aggregations based on outline structure.
- AGG does NOT execute member formula.
- AGG will only aggregate sparse dimensions.
- Test both AGG and CALC DIM as performance can differ depending on levels of aggregation involved in the calculation.
- Exclude dimensions with dynamic calc on upper levels from all aggregations.
- Only aggregate data that is required.
13. SET CALCPARALLEL / FIXPARALLEL Calculation Commands
- For Planning/PBCS models i.e. multi-user applications with potential for rules running concurrently, it is best practice for end user business rules to be run in serial mode.
- Only use SET CALCPARALLEL around full sparse dimension aggregations in batch calculations.
- Parallel calculation is not recommended on small scripts (for example, less than 10 or 20 seconds) as the overhead of creating parallelism may outweigh the benefit.
- When used, always test SET CALCPARALLEL to ensure that it does give a benefit. Sometimes serial calculation or calculations with lower levels of parallelism can give better results.
- Test to determine if FIXPARALLEL would provide better results than SET CALCPARALLEL? Use Calc Manager debug mode to view logs to review.
- Always consider user concurrency when using SET CALCPARALLEL or FIXPARALLEL.
- For more information on FIXPARALLEL, please refer to the documentation: http://docs.oracle.com/cd/ E66975_01/doc.1221/essbase_tech_ref/fixparallel.html
14. Debug Methodology for Developing Business Rules
- Always create a unit test i.e. a small subset of data where you know the source data and the expected results and can easily follow the calculation through manually for this set of data.
- Always use Calc Manager debug mode, or application logs, to view calculation entries to help with any debug during development.
- Ensure all data that is required is present (e.g. if a total is required for allocations) and has been pre-calculated prior to the calculation taking place.
- If the script is long, start debug at the top of the script and work down. An issue further up a script may be creating an issue further down. Debug section by section to ensure that all data is created correctly. Check that later sections of script do not overwrite earlier sections etc.
- Use debug mode (or application log) to ensure that each section of script is calculated sequentially where required.
- Always clear data and reload (i.e. do not use a clear script) when testing any business rule in order to ensure that all blocks are created successfully.
- Always test re-running a script to ensure that the syntax creates correct results for input data and/or populated data.
- Always test all data results with more than one data set.
- Where user input may change data sets e.g. allocations, also test data changing from #missing to a value and from a value to #missing, to ensure that previous calculated results are removed (if required) in second and subsequent runse.g. if a user inputs against Product A,B, C in their first calculation run and then Product B, C, D (and not A) in their second, is the allocation result for Product A correctly removed in the second run.